Sign up for restaurant insights
Read our Grubhub delivery and pickup FAQ to learn the answers to the most commonly asked questions about Grubhub delivery and pickup. For more assistance with Grubhub delivery and pickup please sign in to your Grubhub for Restaurants to access additional order management resources.
Not a Grubhub for Restaurants partner? Sign up today by clicking here.

How do I update my Grubhub delivery boundary?
If you manage your own delivery, you can add delivery areas and change zones from within Grubhub. You can also set different delivery fees for each delivery area.
To update your Grubhub delivery boundary the first thing you will need to do is sign in to your Grubhub for Restaurants account by clicking here.
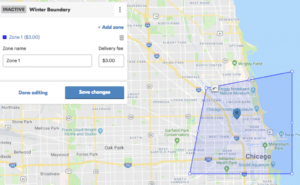
How to create a delivery boundary
- Select Delivery boundary from left sidebar or menu dropdown on mobile.
- To create a new area, click Create boundary
- Select a method to create your delivery boundary:
- Draw my own allows you to customize the area you want to deliver within Distance from my restaurant – pick a distance from your restaurant Zip code – type in zip codes that you want to offer delivery within

- There can be multiple delivery zones in each boundary with different fees.
- Be sure to name all boundaries, include the delivery fee, and then hit Save changes.
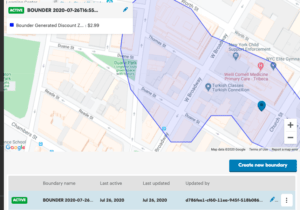
Edit existing boundary
- Click the pencil for the boundary that needs to be updated.
- Drag the end point to edit your boundary. You can also update the name or create a name for each different boundary.
- When you’re done, select Save changes.
How to add additional boundaries
- To create a new boundary click Create new boundary and follow the steps above
- To set an existing boundary live, scroll to the bottom to see a list of existing boundaries
- Click on the toggle of the boundary you would like to set live and select Activate boundary
Reasons why you may receive an error message when saving a delivery boundary
Receive an error when saving a boundary? Here are some potential reasons why:
- Boundary is too large: cannot exceed 70 mile radius from restaurant
- Boundary name already exists: Enter a different name
- Boundary must have a delivery fee: Enter a delivery fee
- Boundary cannot share largest delivery fee with another delivery area: Change fee amount
- Boundary must be within area with the largest delivery fee
How do I set delivery fees and order minimums on Grubhub?
To keep your orders profitable, Grubhub offers total cart minimums that can adjusted at any time. For all self-delivery restaurants, you have the ability to set an additional fee at any delivery boundary in order to cover the cost of your driver.
Delivery Minimum
- Make sure you are logged in to your Grubhub for Restaurants account.
- Navigate to the top left and select the hamburger icon. Choose profile.
- Scroll down to the Order Details section, then select the pencil icon.
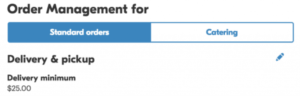
Update the delivery minimum. We recommend picking lower minimums and fees, as that will increase the likelihood of customers ordering from your restaurant.
Finally, Select Submit.
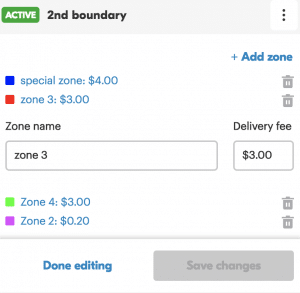
Delivery Fees
- Delivery fee must be updated for each delivery boundary.
- Navigate to the top left and select hamburger icon. Choose Delivery Boundary.
- Click Pencil icon to edit fee on each zone.
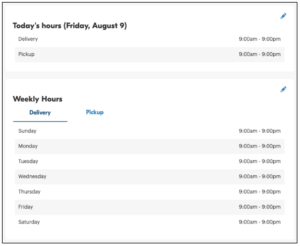
How do I set delivery and pickup hours?
You can update your delivery and pickup hours separately to show when your restaurant is open for business on Grubhub. This allows you to be open for pick-up or delivery to align with your schedule, and remain open for pick-up if you are not doing delivery during all hours of operation. We recommend that you set a wider range for pickup hours than delivery hours if you do not deliver all hours that you are open.
How to set your delivery and pickup hours
- Make sure you are logged in to your Grubhub for Restaurants account.
- Select Hours from the left sidebar on desktop, or the icon on mobile.
- To edit your delivery or pickup hours, click the pencil icon.
- Enter the open and close times for each day. To be closed all day, uncheck the box for each day.
- If you have different hours for breakfast, lunch or dinner, click Split to add a second set of hours.
- Click Save to save changes to your Hours.
How do I set custom delivery or pick up hours on Grubhub?
If you need to temporarily turn off your delivery or pickup but not both, use Custom Hours to do this.
- Select “Create new” in the Custom Hours section.
- Update your hours as necessary for your chosen date(s).
- To learn more how to adjust custom hours.
How do I adjust my catering hours on Grubhub?
To adjust catering hours, follow the instructions above and toggle to Catering. These Catering hours will reflect the delivery times shown to diners.
On the Grubhub platform, Catering Hours represent when you will have staff available to confirm and begin preparing catering orders. Your first available catering delivery will be the start of your Catering Hours plus your delivery estimate. For example if your catering open time is 6:00 am and your delivery estimate is 60 minutes, then your first available catering delivery will be for 7:00am.
What if I need advance notice?
This can be set using the Minimum Advance Notice field at the menu item level when setting up your catering menu. By default, we will give you up to 24 hours notice for all catering orders.
How to set catering hours:
Set catering hours by toggling to Catering in the Hours tab and using the same process as updating regular delivery or pickup hours.